Copy-Machine
Etching
Master a quick and easy way to etch designs and lettering
into
brass or copper using a normal Xerox-type copier and some simple tools.
Excellent
for use in jewelry, assemblage and collage. Alternate
methods of easy etching will also be covered.
The tools below are things you will be using in the workshop, and to avoid having to wait for a communal tool to become available, you should plan on getting them for the class:
• Assorted COPIES to etch with. IMPORTANT - READ THIS. Be sure your copies are from a copier that uses powdered toner, (laser
copies are fine, again, if the toner is powdered) Many KINKO'S copies will not give a satisfactory result,
I've found...
they use a liquid toner rather than a powdered one...try a different copy center.
Try
to keep them purely graphic, as photographic grey-tones won't translate as
accurately with this method [unless they are screened in a dot pattern]. Although I have seen incredible images etched with photographic images, so bring some in to experiment with. In either
case, make sure the copies are good and black, with lots of toner on the paper.
Bring at least three copies of each image you want to try.
IMPORTANT: If you want to use an image of an object or a person/animal, etc., and you want it to etch AS YOU SEE IT in the copy, you'll need to INVERT the image - that is, the black lines or tones should be flipped so they are the white parts on the copy, and vice-versa. Think of a photographic negative - that's what your copy needs to look like for it to etch as a positive image...make sense?
if you want to etch
lettering, you'll need the copy to show the text BACKWARDS. This can be done in one of three ways:
1) manipulate the text on a computer, then flip it so it's backwards and print it out onto good quality paper. Then you can take that to the copy place to have your copies made.
2) Some copy machines have a button that will flip the image.
3) Copy your text first onto copier-safe acetate, then flip the acetate
over and copy that onto paper, making the type backwards on the paper...make
sense? Keep in mind that whatever you copy will be flipped from the original.)
Bold, strong images will tend to give better results (i.e., copies with lots
of black).
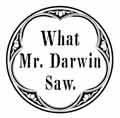
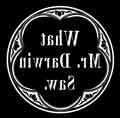
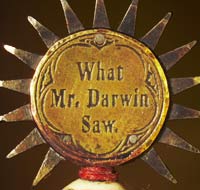
So, if you have images AND text together, and you want them to read correctly on the metal, you'll need to flip AND invert the image. See images here:

Original text

Copy - Flipped and Inverted

Finished plate
Another
suggestion regarding copies for the class is not to gang the images
up smack next to each other; leave at least 1 inch of white paper
around each side of the image. You'll breathe a bit easier!
• Hand drill. A cordless, variable-speed hand drill is
perfect and will be one of the most useful tools in your home, trust me! Here is one for $30 that fits the bill. Be
sure to charge up the battery before getting to the class! I have also gotten an excellent 'cordless compact drill/driver', made by Chicago Tools, at Harbor Freight (though for some reason they don't have it on their website). Go in, if you live near a Harbor Freight, and ask for their "Cordless Compact Drill-Driver". For those who don't
want to get the electric drill, Fiskars
makes a good and very inexpensive manual drill (like under $15!): <Here> It
isn't as versatile, but it will work in a pinch.
• Set
of drill bits (any standard hardware-store set of 'high-speed
steel' drill bits)
• Two extra 1/16" drill bits
• Piece of scrap wood to drill into
• Scraps or sheets of copper, brass or nickel; or objects made of these metals you'd like to etch onto. Remember that if you use foil-thin metal, you will only be able to etch very lightly. Copper or brass sheeting (up to 1 mm thick is perfect) can be purchased most inexpensively through a local metal surplus yard...look in the yellow pages under scrap metal, then call to ask if they allow the public to buy. The metal is sold by the pound, so it's much cheaper than buying it from a jewelry or hobby supply. Most model train / hobby stores will have sheets of brass and copper as well. I would recommend against the rolls of copper foil sold in some craft stores, as it is so thin that there isn't much depth to etch into, but if you have some, bring it, as it can still be used for certain effects.
• Tin
snips (Wiss makes the most commonly found one, though
if you're planning on snipping a lot of metal, these aviation 'lever
snips' cut beautifully with less hand effort (one cuts to the left,
and one to the right, and either will cut straight):
<http://www.aircraftspruce.com/menus/to/handtools.html?pg=3>
• Several copied designs you'd like to try to etch (keep
them small. be sure they are from a copier using toner, and not laser
copies...if it is black and white or color TONER, they are OK. Try
to keep them purely graphic, as photographic grey-tones won't translate as
well with this method [unless they are screened in a dot pattern]. In either
case, make sure the copies are good and black, with lots of toner on the paper.
Bring at least three copies of each image you want to try. if you want to etch
lettering, you must first copy it onto copier-safe acetate, then flip the acetate
over and copy that onto paper, making the type backwards on the paper...make
sense? Keep in mind that whatever you copy will be flipped from the original.)
Bold, strong images will tend to give better results (i.e., copies with lots
of black).
Another
suggestion regarding copies for the class is not to gang the images
up smack next to each other; leave at least 1 inch of white paper
around each side of the image. You'll breathe a bit easier!
Note: Many KINKO'S copies will not give a satisfactory result,
I've found...
must be something to do with their own toner...try a different copy center.
• A bottle of ferric chloride solution. This has become much harder to procure lately, as Radio Shack stopped carrying the stuff. Look up any electronics supply places in your area, and ask for 'PCB (circuit board) etchant.' Or, to order online, try MG Chemicals. You may want to have it shipped to the venue in advance, if you're flying, as they won't let it on airplanes now. Sheesh! If you're in the class with
a friend, you can share a bottle.
• Small can of acetone (available at any hardware store). Don't bring nail-polish remover, as it is weaker than pure acetone. If you're in the class with a friend, you can share a bottle.
• Small
bottle of ammonia. If you're in the class with a friend,
you can share a bottle.
• A small flat plastic tupperware or microwave-dinner tray,
about 1-2 inches deep
• Cotton balls, or better yet, cotton pads
• Scotch-Brite pad
•Sharpie markers (the fresher the better... make sure to get at least one wide or chisel-point)
• Roll of masking tape (as wide a roll as you can get)
or clear packing tape
• Old
rag for wiping up any spills, etc.
OPTIONAL (these will enable
you to cut out your metal more precisely):
• jeweller's saw with a 4" to 6" frame depth <Here>
• saw blades <Here> (get two sizes: 1 dz. of the 1 size (#185-0100) and 1 dz. of 2/0 size (#185-0020)
• bench pin <Here> (if yours doesn't come with a clamp to hold it to the table, bring a BAR CLAMP <Here>
• spring-loaded, or 'automatic' center punch. Can be found at most
hardware stores, but go here to see what they look like. Here is a lightweight version that is quite nice).
Please email me with any questions you might have that this page didn't address.
See you there! Keith
